 |
| "Grandma always made you feel she had been waiting to see just you all day and now the day was complete" |
It started as an inspiration from the works of master craftsman Elia Locardi, this guy is a master of time blending. As he always says so rightly we remember a place not by a flash of a moment, we remember it by time. We create memories of a beautiful beach by feeling the whole sunset till the time stars come out, it's a duration of time that generates feeling not a flash.
So that what I went out to create on the beautiful banks of river Brahmaputra that afternoon.
It took me about an hour or two to find the right composition, I wanted something that fits good for a sunset and a startrail. This small beach leading to the river and the boat looked promising so I set myself down in there.
 |
| The small beach. |
 |
| The setup and the frame. |
My plan for this composition was to stick with it till astronomical night and get some startrail along with the sunset. That was an ambitious plan by any count as it's was mid monsoon and that means rain clouds at any moment can kill the plan. And that's exactly what happened as soon as I got my sunset shot in the bag, clouds moved in and bye bye startrail.
But before that happened something interesting did, out of the village nearby came the sweetest little Grandma. She silently came near me and asked "Can I check if that's my son's boat?" and I was just stunned by her humble ask. Here she was worried sick if her son is back, but she still manages to hold her composure and ask me as if my picture is any important. As she was standing on the beach trying to see as far as her old eyes could muster, I thought of just capturing this moment just for my emotional bag.
I was determined to make this picture work so I broke off from my style and did a composit for this one. And I couldn't stop myself from adding Grandma to the picture.
It seems this picture worked as I posted this picture on social media, I got lot of requests to share how I made the picture. So here goes nothing :)
I will try to show you my post processing steps in here with screen shots.
Let me show you my shot selection for the composit. I was using a Nikon D7200 camera body paired with Tokina 11-16mm f2.8 lens shot @ 15mm ISO 100 and used a tripod Vanguard 263AT for rock solid stability.
#1 A well illuminated foreground.


#3 Now for the sun-star I narrowed the aperture to f/22 and increased the shutter speed to 1/50th of a second.

Now as I waited for the sun to go down for my star trail shots, one sweet Grandma came to check on if her son or grandson returned from fishing in the river. So without thinking much I took a caution shot, as she stood there for a minute looking out. Well as luck would play it, this became my anchor to the story for the picture and shot number #4.


So after I selected all the above shots and minor fixes done in Adobe Lightroom, I opened them up in Photoshop as layers.
Following are the screens of the processing done on it.
Base layer is the first shot with illuminated foreground.

To remove the lens flare for the above I used the second shot with no flare.

I masked out the covered area and brought the sky and sun only from the base layer.

Now I used the sun star layer on top of them.

I again used a luminosity mask on only take in the sky and the reflection of it on the river.

In the next layer I brought in the Star trail shot.

Using a blending mode "Soft Light" only brought out the starts of that layer.

Now used a mask to only show the sky area.

Now my base picture is ready.

Next I used a Clipping Masked Curve adjustment layer to add midtone brightness to the sky and also fix the colour balance a bit.

Finally as I was completing the picture, I added the Grandma shot.

Used a custom mask to only show her and her shadow.

Now as you see it add a unique dynamics to this picture. And completes the story of the picture.

Finally I did some CA cleanup as all the processing and masking added a few odd ones in such a high dynamic range scene.

That's how I made this picture, hope this information is helpful to you. And will inspire you to try time blending.
You can visit my Facebook page and 500px page to view and review my work.
But before that happened something interesting did, out of the village nearby came the sweetest little Grandma. She silently came near me and asked "Can I check if that's my son's boat?" and I was just stunned by her humble ask. Here she was worried sick if her son is back, but she still manages to hold her composure and ask me as if my picture is any important. As she was standing on the beach trying to see as far as her old eyes could muster, I thought of just capturing this moment just for my emotional bag.
I was determined to make this picture work so I broke off from my style and did a composit for this one. And I couldn't stop myself from adding Grandma to the picture.
 |
| The final picture Grandma. |
I will try to show you my post processing steps in here with screen shots.
Let me show you my shot selection for the composit. I was using a Nikon D7200 camera body paired with Tokina 11-16mm f2.8 lens shot @ 15mm ISO 100 and used a tripod Vanguard 263AT for rock solid stability.
#1 A well illuminated foreground.

#2 Used the finger to cover the direct sun on the lens and avoid lens flare.

#3 Now for the sun-star I narrowed the aperture to f/22 and increased the shutter speed to 1/50th of a second.


#5 my luck soon wore out and the rest of the evening till night deep clouds turned in killing all chances of a star trail possibility there. So I used another star trail shot towards the same direction on the other side of the river in winter of 2016. LINK

So after I selected all the above shots and minor fixes done in Adobe Lightroom, I opened them up in Photoshop as layers.
Following are the screens of the processing done on it.
Base layer is the first shot with illuminated foreground.

To remove the lens flare for the above I used the second shot with no flare.

I masked out the covered area and brought the sky and sun only from the base layer.

Now I used the sun star layer on top of them.

I again used a luminosity mask on only take in the sky and the reflection of it on the river.

In the next layer I brought in the Star trail shot.

Using a blending mode "Soft Light" only brought out the starts of that layer.

Now used a mask to only show the sky area.
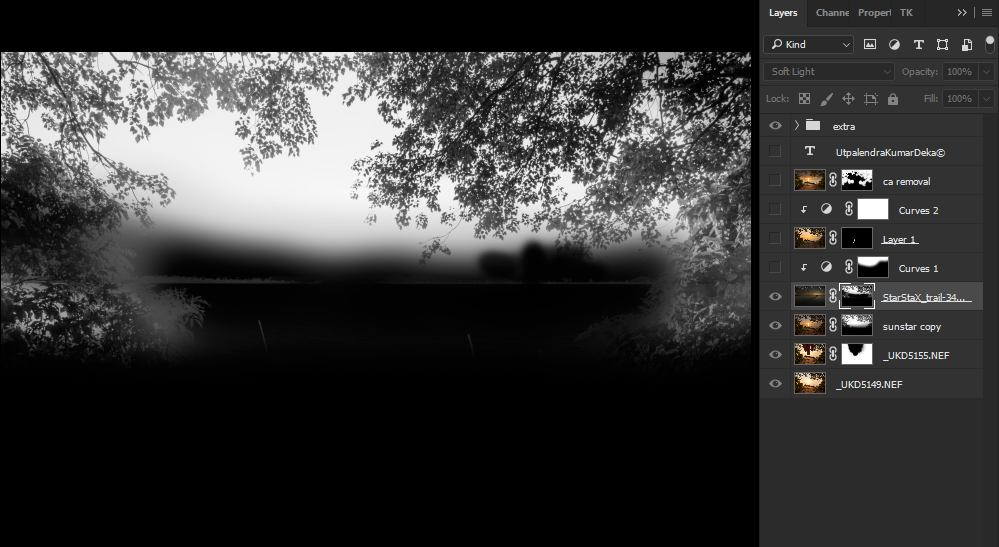
Now my base picture is ready.

Next I used a Clipping Masked Curve adjustment layer to add midtone brightness to the sky and also fix the colour balance a bit.

Finally as I was completing the picture, I added the Grandma shot.

Used a custom mask to only show her and her shadow.

Now as you see it add a unique dynamics to this picture. And completes the story of the picture.

Finally I did some CA cleanup as all the processing and masking added a few odd ones in such a high dynamic range scene.

That's how I made this picture, hope this information is helpful to you. And will inspire you to try time blending.
You can visit my Facebook page and 500px page to view and review my work.
 |
| HAPPY SHOOTING |


