Showing posts with label Landscape photography. Show all posts
Showing posts with label Landscape photography. Show all posts

Sep 1, 2017
A photograph is hidden in RAW #7 : Another Time Blend with the whole post processing flow

Aug 4, 2017
A photograph is hidden in RAW #6 : Time Blending
 |
| "Grandma always made you feel she had been waiting to see just you all day and now the day was complete" |
It started as an inspiration from the works of master craftsman Elia Locardi, this guy is a master of time blending. As he always says so rightly we remember a place not by a flash of a moment, we remember it by time. We create memories of a beautiful beach by feeling the whole sunset till the time stars come out, it's a duration of time that generates feeling not a flash.
So that what I went out to create on the beautiful banks of river Brahmaputra that afternoon.
It took me about an hour or two to find the right composition, I wanted something that fits good for a sunset and a startrail. This small beach leading to the river and the boat looked promising so I set myself down in there.
 |
| The small beach. |
 |
| The setup and the frame. |
My plan for this composition was to stick with it till astronomical night and get some startrail along with the sunset. That was an ambitious plan by any count as it's was mid monsoon and that means rain clouds at any moment can kill the plan. And that's exactly what happened as soon as I got my sunset shot in the bag, clouds moved in and bye bye startrail.
But before that happened something interesting did, out of the village nearby came the sweetest little Grandma. She silently came near me and asked "Can I check if that's my son's boat?" and I was just stunned by her humble ask. Here she was worried sick if her son is back, but she still manages to hold her composure and ask me as if my picture is any important. As she was standing on the beach trying to see as far as her old eyes could muster, I thought of just capturing this moment just for my emotional bag.
I was determined to make this picture work so I broke off from my style and did a composit for this one. And I couldn't stop myself from adding Grandma to the picture.
It seems this picture worked as I posted this picture on social media, I got lot of requests to share how I made the picture. So here goes nothing :)
I will try to show you my post processing steps in here with screen shots.
Let me show you my shot selection for the composit. I was using a Nikon D7200 camera body paired with Tokina 11-16mm f2.8 lens shot @ 15mm ISO 100 and used a tripod Vanguard 263AT for rock solid stability.
#1 A well illuminated foreground.


#3 Now for the sun-star I narrowed the aperture to f/22 and increased the shutter speed to 1/50th of a second.

Now as I waited for the sun to go down for my star trail shots, one sweet Grandma came to check on if her son or grandson returned from fishing in the river. So without thinking much I took a caution shot, as she stood there for a minute looking out. Well as luck would play it, this became my anchor to the story for the picture and shot number #4.


So after I selected all the above shots and minor fixes done in Adobe Lightroom, I opened them up in Photoshop as layers.
Following are the screens of the processing done on it.
Base layer is the first shot with illuminated foreground.

To remove the lens flare for the above I used the second shot with no flare.

I masked out the covered area and brought the sky and sun only from the base layer.

Now I used the sun star layer on top of them.

I again used a luminosity mask on only take in the sky and the reflection of it on the river.

In the next layer I brought in the Star trail shot.

Using a blending mode "Soft Light" only brought out the starts of that layer.

Now used a mask to only show the sky area.

Now my base picture is ready.

Next I used a Clipping Masked Curve adjustment layer to add midtone brightness to the sky and also fix the colour balance a bit.

Finally as I was completing the picture, I added the Grandma shot.

Used a custom mask to only show her and her shadow.

Now as you see it add a unique dynamics to this picture. And completes the story of the picture.

Finally I did some CA cleanup as all the processing and masking added a few odd ones in such a high dynamic range scene.

That's how I made this picture, hope this information is helpful to you. And will inspire you to try time blending.
You can visit my Facebook page and 500px page to view and review my work.
But before that happened something interesting did, out of the village nearby came the sweetest little Grandma. She silently came near me and asked "Can I check if that's my son's boat?" and I was just stunned by her humble ask. Here she was worried sick if her son is back, but she still manages to hold her composure and ask me as if my picture is any important. As she was standing on the beach trying to see as far as her old eyes could muster, I thought of just capturing this moment just for my emotional bag.
I was determined to make this picture work so I broke off from my style and did a composit for this one. And I couldn't stop myself from adding Grandma to the picture.
 |
| The final picture Grandma. |
I will try to show you my post processing steps in here with screen shots.
Let me show you my shot selection for the composit. I was using a Nikon D7200 camera body paired with Tokina 11-16mm f2.8 lens shot @ 15mm ISO 100 and used a tripod Vanguard 263AT for rock solid stability.
#1 A well illuminated foreground.

#2 Used the finger to cover the direct sun on the lens and avoid lens flare.

#3 Now for the sun-star I narrowed the aperture to f/22 and increased the shutter speed to 1/50th of a second.


#5 my luck soon wore out and the rest of the evening till night deep clouds turned in killing all chances of a star trail possibility there. So I used another star trail shot towards the same direction on the other side of the river in winter of 2016. LINK

So after I selected all the above shots and minor fixes done in Adobe Lightroom, I opened them up in Photoshop as layers.
Following are the screens of the processing done on it.
Base layer is the first shot with illuminated foreground.

To remove the lens flare for the above I used the second shot with no flare.

I masked out the covered area and brought the sky and sun only from the base layer.

Now I used the sun star layer on top of them.

I again used a luminosity mask on only take in the sky and the reflection of it on the river.

In the next layer I brought in the Star trail shot.

Using a blending mode "Soft Light" only brought out the starts of that layer.

Now used a mask to only show the sky area.
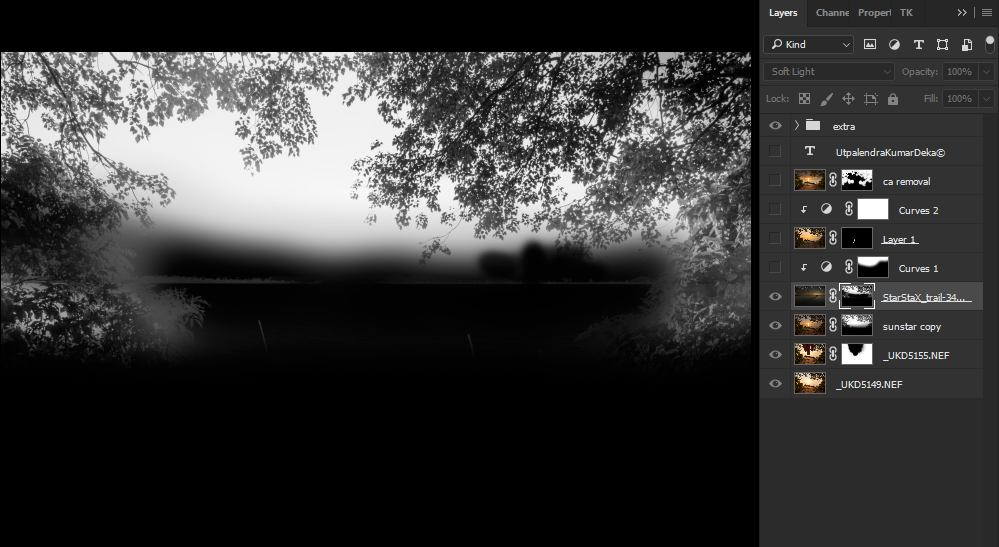
Now my base picture is ready.

Next I used a Clipping Masked Curve adjustment layer to add midtone brightness to the sky and also fix the colour balance a bit.

Finally as I was completing the picture, I added the Grandma shot.

Used a custom mask to only show her and her shadow.

Now as you see it add a unique dynamics to this picture. And completes the story of the picture.

Finally I did some CA cleanup as all the processing and masking added a few odd ones in such a high dynamic range scene.

That's how I made this picture, hope this information is helpful to you. And will inspire you to try time blending.
You can visit my Facebook page and 500px page to view and review my work.
 |
| HAPPY SHOOTING |
Jun 14, 2017
A photograph is hidden in RAW #5 : Midday Landscape Photography.

Let's see how I created this picture.
Jan 5, 2017
A photograph is hidden in RAW #4 : Night photography and a star-trail.
Night photography was always a challenge to me. There are so many factors to get a desired shot that it is sometimes very taxing. Nevertheless every winter I try my luck anyway, as winters bring cool calm wind less and cloud less skies. The cool air also helps in getting sharper celestial views.
So last year (2016) at end of December I went with few friends to a location which is expected to have minimum light pollution. There was no shot that I had in mind, living in the northern hemisphere there is no chance to get a good view of the Milkyway centre during that time. So all of us were almost ready and half expecting to have some star trail shots from this night shoot.
And here is what I got!
Some of my friends and fellow photography enthusiast wanted to know how this picture was made. So here you go friends.
There are two stages of making this picture first being capturing the necessary shots keeping a lose aim on what we want to create finally.
Night photography compounds the same rules of getting a good picture during day composition, light and an anchoring subject. In my mind I did not want to have this just as a simple startrail picture but to have more interest to it. So I stated looking for complementing subjects and right out of darkness I saw this fishing net in the shallows of the river and a line of crap to push the fish towards it. Now that looked interesting and after a few test shots I set my mind to this final composition. For the stars as I was pointing towards South West and my phone app Planit! told me that the star movement will place them right on top of my net. So I was a little optimistic.
Now a few tools of trade that we must have to capture a star trail as I did,
Finally after reviewing the shots on my camera's LCD screen and somewhat satisfied, we called it a night.
First I took all of those 150 shots to Lightroom and did some minor tweaks like removing the Chromatic Aberration and adding a little bit of exposure. Now I took these 150 shots to Starstax and created the startrail with fair bit of Gap filling used. Ones I was satisfied with the trails I exported it to Photoshop as a layer.
On top of that I brought in the 150th shot from that stack of pictures and converted the mode to Linear Dodge with 70% layer opacity. This helped me to bring back some of the static stars into the sky and I masked out the foreground from that layer.
If you remember I mentioned about my light painted foreground frame. Well here is where I brought that in and using a Lights luminosity mask showed only the foreground leading line with 90% layer opacity.
Finally I removed some of the stray lights in the right horizon with another frame from the 150 set using a mask to paint out that area.
And that's all it took to get the final frame that you see today.
I hope this will help you create you own startrail picture. Just remember, the viewer is interested something beyond the technique. A technically strong picture might not be the best one, it also has to have the right recipe of Composition, Light and Subject.
If you think this was helpful to you please leave a comment or critique. You can visit my Facebook page and 500px page to view and review my work.
So last year (2016) at end of December I went with few friends to a location which is expected to have minimum light pollution. There was no shot that I had in mind, living in the northern hemisphere there is no chance to get a good view of the Milkyway centre during that time. So all of us were almost ready and half expecting to have some star trail shots from this night shoot.
 |
| Star Catch |
Some of my friends and fellow photography enthusiast wanted to know how this picture was made. So here you go friends.
There are two stages of making this picture first being capturing the necessary shots keeping a lose aim on what we want to create finally.
Night photography compounds the same rules of getting a good picture during day composition, light and an anchoring subject. In my mind I did not want to have this just as a simple startrail picture but to have more interest to it. So I stated looking for complementing subjects and right out of darkness I saw this fishing net in the shallows of the river and a line of crap to push the fish towards it. Now that looked interesting and after a few test shots I set my mind to this final composition. For the stars as I was pointing towards South West and my phone app Planit! told me that the star movement will place them right on top of my net. So I was a little optimistic.
Now a few tools of trade that we must have to capture a star trail as I did,
- A camera which can take a intervelometer or has a in built one. I use a Nikon D7200 so I am sorted on that.
- A fast lens, something that has an aperture below f/2.8. For this shot I used a Tokina 11-16mm f/2.8 which is sharp and gets me the picture I want.
- A very sturdy tripod is an absolute must.
- A determined and calm mind, because you will surely need it. Believe me! :)
- A friend to chit chat to kill time during the exposure or very tasty pack of snacks with hot tea. (...as alcohol does not mix well with photography or anything else for that matter.)
 |
| One of the 150 shots at ISO1600 12mm f/2.8 for 30secs |
For this shot I set my temperature to 5095 Kelvin shooting in RAW at ISO1600 12mm f/2.8 for 30secs exposure. And I took 150 shots at that same setting with a in-between shot gap of 4 secs. This took my shooting time to 85 minutes.
On a side note which the experts don't tell and I had to learn the hard way is, you have to take a complete black shot of the same frame with the lens cap on, that can be used later in post processing for noise reduction.
On a side note which the experts don't tell and I had to learn the hard way is, you have to take a complete black shot of the same frame with the lens cap on, that can be used later in post processing for noise reduction.
 |
| Foreground light painted frame, shot at ISO400 12mm f/10 30secs |
And as I had a leading line in my composition so I took a light painted shot of the foreground for safe measure at ISO400 12mm f/10 30secs.
Finally after reviewing the shots on my camera's LCD screen and somewhat satisfied, we called it a night.
This starts the second part of making this picture called Post Processing.
 |
| Base layer of the complete star trail. |
First I took all of those 150 shots to Lightroom and did some minor tweaks like removing the Chromatic Aberration and adding a little bit of exposure. Now I took these 150 shots to Starstax and created the startrail with fair bit of Gap filling used. Ones I was satisfied with the trails I exported it to Photoshop as a layer.
 |
| Added more stars with a Linear dodged frame of the set. |
On top of that I brought in the 150th shot from that stack of pictures and converted the mode to Linear Dodge with 70% layer opacity. This helped me to bring back some of the static stars into the sky and I masked out the foreground from that layer.
 |
| Foreground interest. |
Finally I removed some of the stray lights in the right horizon with another frame from the 150 set using a mask to paint out that area.
And that's all it took to get the final frame that you see today.
I hope this will help you create you own startrail picture. Just remember, the viewer is interested something beyond the technique. A technically strong picture might not be the best one, it also has to have the right recipe of Composition, Light and Subject.
If you think this was helpful to you please leave a comment or critique. You can visit my Facebook page and 500px page to view and review my work.
Oct 28, 2016
A photograph is hidden in RAW #3 : Waterfall magic.
 This fall it was all about intimate landscapes for me. I just wanted to see how I do with small waterfalls in nearby Meghalaya. After so many visits I know exactly which one I will go for.
This particular one is right by the main road but a little obscured, that keeps it hidden from the common tourist footfall.
Although the waterfall looks very small here as I used a ultra wide lens but it's height is easily above 20 feet. I was with few of my fellow photography enthusiast friends, and we all loved this small intimate fall.
For this picture I used my trusty Tokina 11-16mm f2.8 lens on a Nikon D7200 body. As the sun was on my left shoulder and making the wet rocks shine, I thought why not used a polarise (CPL) to cut out the reflection from there. I was very interested in showing the texture on the rocks and pop out the colours of the forest above and the rocks below using the CPL. Now the CPL was giving me about a single stop of difference in light so I compensated by increasing the shutter speed by one full stop to 1/5 sec.
This made the falling water a little smooth but I wanted more. So I brought out the the 16 stop Neutral Density filter in front of the CPL. This gave me a long enough shutter speed of 4 sec which, was enough to have this beautiful smooth water flow effect and a very interesting splash spread at the bottom. As soon as I saw these frames on my camera LCD, I knew I got a special shot in my bag that day.
 |
| Phone shot of the location ans setup. |
Till the next picture, keep clicking!!
You can visit my Facebook page and 500px page to view and review my work.
Sep 28, 2016
A photograph is hidden in RAW #2 : Processing a Milkyway frame

I always wondered how it might feel to see the milkyway with your own eyes. So we packed up for a night shooting trip to Cherrpunji hoping for clear skies and the view of the majestic.
We got first time lucky and it felt awesome so see it, as you see it in the picture here.
Emotions apart some of my friends asked me to show how I produced this view. So here it is...
This is a single 25 second exposure shot on Nikon D7200 and Tokina 11-16mm f2.8 at 11mm f2.8 ISO1600. So here is the standard before and after :)

Now here are the steps how I reached here.
 |
| Triple processing. |
I prepared the image on Lightroom by triple processing it.
#1 is for the Milkyway with some clerity and contrast to the sky.
#2 is for the warm foreground and the tree fixing the white balance.
#3 for the storm clouds with lighting to maintain some details in its highlights.

Now I opened all three files as layers in Photoshop, keeping the tree frame in the bottom.

Milkyway frame in the middle and used a mask to only show the milkyway on it.

On top of that I kept the storm cloud frame and used a mask to just bring out the detail in the clouds.

After that I used three selective contrast curve adjustment layers to add and subtract contrast in the clouds, reflecting water and the mid ground rocks.

Then I enhanced the colours in the sky independently to the milkyway centre and the storm clouds.

And finally added a little bit of bright midtones and warmed up the foreground. And voila its done.
I hope this will help you processing you own milkyway shot.
Aug 11, 2016
What it takes for a interesting frame.
Some might think it's easy to take simple shots, some might even think it's easy to bake a fruit cake. Believe me they are wrong on both, unless one has magical golden hands. :)
Let's take this picture for instance, seems very simple right! One might even wonder "What's special about it?".
It's actually the effort & aspiration the photographer endures to take the shot which makes it special for him.

This shot has been taken inside the dense forest near Chandubi lake.
It was a hot sunny day and the lake itself was not giving any interesting frames, so I went in to take some under the jungle canopy shots.
I found this small cascade quitely tucked away in a small rocky valley and it intrigued me to find a frame there. All this while I was keeping a good lookout for any kind of wild animals passing by, happy to dip into this cool flowing water on such hot sunny day. And then there are big jungle leeches always probing to cling on to ongoing human targets :)
 |
| Tripod in water and hanging on to dear life. |
With all my courage and taking some calculated risks I climbed down the slippery rocky walled valley to reach this cascade. As I reached the bottom I immediately knew there are at least five of these big jungle leeches clinging onto my waders, trying to reach soft tissue and feed themselves. So I quickly took my pocket knife and plucked them off. Phew! That was close!
 |
| Setting up the first frame, standing in hip deep water and clinging to a slippery overhand. |
Now back to my shot I started trying to find a good composition, and I found that nothing was working out. The only frame that is somewhat interesting, needed me to get down hip deep in this leech filled water from under a very mossy and slippery overhang.
Now as I got down the valley I was ready to commit to anything and get the frame.
So, I started taking bracketed shots considering the bright sunlit jungle and moss on the rock and the deep shadows of the rocks. As I was busy taking pictures I realised that something is biting me on my arm. To check that I got out of water and saw that there is about a 3 inch long leech stuck to my under arm bloated with blood sucked off me. Although the very sight of the blood sucker freaked me to death, I kept my composure as there was no one to help and again took my pocket knife to pull it off. And finally I got the shot even after all this hustle.
 So you probably get it now, it literally took my blood and sweat to take this simple shot :).
You can visit my Facebook page and 500px page to view and review my work.
Aug 6, 2016
Pohor a yearly photography extravaganza
This year we have seen a steep increase in macro and bird photographs, at the same time diminishing landscape photographs. C'mon fellow landscape photographers let's take a good aim for next year :)
Jokes apart it was a delight to see some amazing bird pictures and macro shots, some of them are here. And yea one of my pictures "Nets of Fortune" got featured too.
Top center is mine.(picture above)


Some astonishing landscape photographs made it too.


Subscribe to:
Posts (Atom)