
Showing posts with label Photoshop. Show all posts
Showing posts with label Photoshop. Show all posts
Sep 1, 2017
A photograph is hidden in RAW #7 : Another Time Blend with the whole post processing flow

Aug 4, 2017
A photograph is hidden in RAW #6 : Time Blending
 |
| "Grandma always made you feel she had been waiting to see just you all day and now the day was complete" |
It started as an inspiration from the works of master craftsman Elia Locardi, this guy is a master of time blending. As he always says so rightly we remember a place not by a flash of a moment, we remember it by time. We create memories of a beautiful beach by feeling the whole sunset till the time stars come out, it's a duration of time that generates feeling not a flash.
So that what I went out to create on the beautiful banks of river Brahmaputra that afternoon.
It took me about an hour or two to find the right composition, I wanted something that fits good for a sunset and a startrail. This small beach leading to the river and the boat looked promising so I set myself down in there.
 |
| The small beach. |
 |
| The setup and the frame. |
My plan for this composition was to stick with it till astronomical night and get some startrail along with the sunset. That was an ambitious plan by any count as it's was mid monsoon and that means rain clouds at any moment can kill the plan. And that's exactly what happened as soon as I got my sunset shot in the bag, clouds moved in and bye bye startrail.
But before that happened something interesting did, out of the village nearby came the sweetest little Grandma. She silently came near me and asked "Can I check if that's my son's boat?" and I was just stunned by her humble ask. Here she was worried sick if her son is back, but she still manages to hold her composure and ask me as if my picture is any important. As she was standing on the beach trying to see as far as her old eyes could muster, I thought of just capturing this moment just for my emotional bag.
I was determined to make this picture work so I broke off from my style and did a composit for this one. And I couldn't stop myself from adding Grandma to the picture.
It seems this picture worked as I posted this picture on social media, I got lot of requests to share how I made the picture. So here goes nothing :)
I will try to show you my post processing steps in here with screen shots.
Let me show you my shot selection for the composit. I was using a Nikon D7200 camera body paired with Tokina 11-16mm f2.8 lens shot @ 15mm ISO 100 and used a tripod Vanguard 263AT for rock solid stability.
#1 A well illuminated foreground.


#3 Now for the sun-star I narrowed the aperture to f/22 and increased the shutter speed to 1/50th of a second.

Now as I waited for the sun to go down for my star trail shots, one sweet Grandma came to check on if her son or grandson returned from fishing in the river. So without thinking much I took a caution shot, as she stood there for a minute looking out. Well as luck would play it, this became my anchor to the story for the picture and shot number #4.


So after I selected all the above shots and minor fixes done in Adobe Lightroom, I opened them up in Photoshop as layers.
Following are the screens of the processing done on it.
Base layer is the first shot with illuminated foreground.

To remove the lens flare for the above I used the second shot with no flare.

I masked out the covered area and brought the sky and sun only from the base layer.

Now I used the sun star layer on top of them.

I again used a luminosity mask on only take in the sky and the reflection of it on the river.

In the next layer I brought in the Star trail shot.

Using a blending mode "Soft Light" only brought out the starts of that layer.

Now used a mask to only show the sky area.

Now my base picture is ready.

Next I used a Clipping Masked Curve adjustment layer to add midtone brightness to the sky and also fix the colour balance a bit.

Finally as I was completing the picture, I added the Grandma shot.

Used a custom mask to only show her and her shadow.

Now as you see it add a unique dynamics to this picture. And completes the story of the picture.

Finally I did some CA cleanup as all the processing and masking added a few odd ones in such a high dynamic range scene.

That's how I made this picture, hope this information is helpful to you. And will inspire you to try time blending.
You can visit my Facebook page and 500px page to view and review my work.
But before that happened something interesting did, out of the village nearby came the sweetest little Grandma. She silently came near me and asked "Can I check if that's my son's boat?" and I was just stunned by her humble ask. Here she was worried sick if her son is back, but she still manages to hold her composure and ask me as if my picture is any important. As she was standing on the beach trying to see as far as her old eyes could muster, I thought of just capturing this moment just for my emotional bag.
I was determined to make this picture work so I broke off from my style and did a composit for this one. And I couldn't stop myself from adding Grandma to the picture.
 |
| The final picture Grandma. |
I will try to show you my post processing steps in here with screen shots.
Let me show you my shot selection for the composit. I was using a Nikon D7200 camera body paired with Tokina 11-16mm f2.8 lens shot @ 15mm ISO 100 and used a tripod Vanguard 263AT for rock solid stability.
#1 A well illuminated foreground.

#2 Used the finger to cover the direct sun on the lens and avoid lens flare.

#3 Now for the sun-star I narrowed the aperture to f/22 and increased the shutter speed to 1/50th of a second.


#5 my luck soon wore out and the rest of the evening till night deep clouds turned in killing all chances of a star trail possibility there. So I used another star trail shot towards the same direction on the other side of the river in winter of 2016. LINK

So after I selected all the above shots and minor fixes done in Adobe Lightroom, I opened them up in Photoshop as layers.
Following are the screens of the processing done on it.
Base layer is the first shot with illuminated foreground.

To remove the lens flare for the above I used the second shot with no flare.

I masked out the covered area and brought the sky and sun only from the base layer.

Now I used the sun star layer on top of them.

I again used a luminosity mask on only take in the sky and the reflection of it on the river.

In the next layer I brought in the Star trail shot.

Using a blending mode "Soft Light" only brought out the starts of that layer.

Now used a mask to only show the sky area.
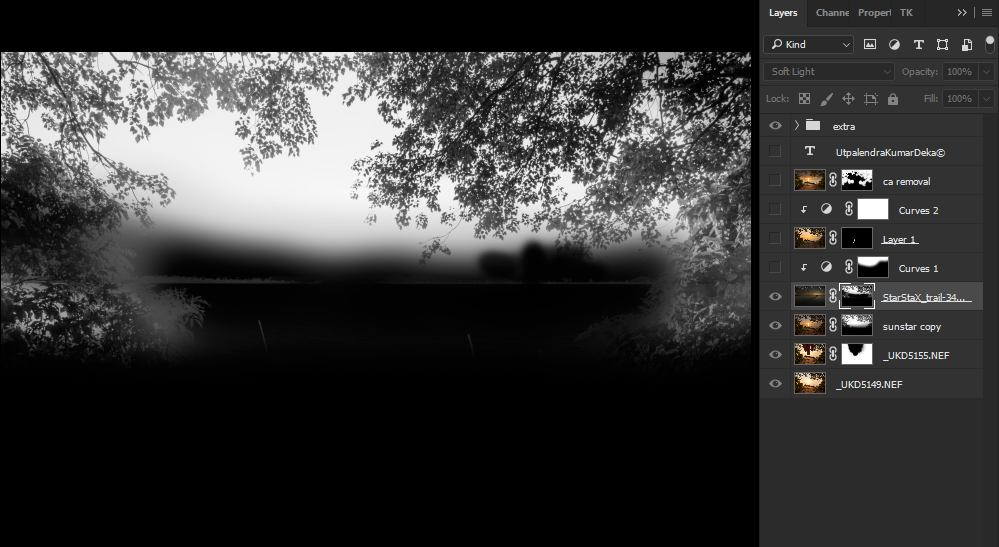
Now my base picture is ready.

Next I used a Clipping Masked Curve adjustment layer to add midtone brightness to the sky and also fix the colour balance a bit.

Finally as I was completing the picture, I added the Grandma shot.

Used a custom mask to only show her and her shadow.

Now as you see it add a unique dynamics to this picture. And completes the story of the picture.

Finally I did some CA cleanup as all the processing and masking added a few odd ones in such a high dynamic range scene.

That's how I made this picture, hope this information is helpful to you. And will inspire you to try time blending.
You can visit my Facebook page and 500px page to view and review my work.
 |
| HAPPY SHOOTING |
Sep 28, 2016
A photograph is hidden in RAW #2 : Processing a Milkyway frame

I always wondered how it might feel to see the milkyway with your own eyes. So we packed up for a night shooting trip to Cherrpunji hoping for clear skies and the view of the majestic.
We got first time lucky and it felt awesome so see it, as you see it in the picture here.
Emotions apart some of my friends asked me to show how I produced this view. So here it is...
This is a single 25 second exposure shot on Nikon D7200 and Tokina 11-16mm f2.8 at 11mm f2.8 ISO1600. So here is the standard before and after :)

Now here are the steps how I reached here.
 |
| Triple processing. |
I prepared the image on Lightroom by triple processing it.
#1 is for the Milkyway with some clerity and contrast to the sky.
#2 is for the warm foreground and the tree fixing the white balance.
#3 for the storm clouds with lighting to maintain some details in its highlights.

Now I opened all three files as layers in Photoshop, keeping the tree frame in the bottom.

Milkyway frame in the middle and used a mask to only show the milkyway on it.

On top of that I kept the storm cloud frame and used a mask to just bring out the detail in the clouds.

After that I used three selective contrast curve adjustment layers to add and subtract contrast in the clouds, reflecting water and the mid ground rocks.

Then I enhanced the colours in the sky independently to the milkyway centre and the storm clouds.

And finally added a little bit of bright midtones and warmed up the foreground. And voila its done.
I hope this will help you processing you own milkyway shot.
Jun 7, 2016
A photograph is hidden in RAW #1: Post processing a long exposure frame.

A few of my friends were interested in understanding what are the in-between steps from taking this picture from RAW to the final output.
So I thought why not write a small tutorial :)
Step 1 : Opened the RAW file in Adobe Lightroom to balance the exposure by adjusting the Highlights and Shadows and finally a little bit of increase in exposure. I fixed the White Balance of the image to what it looked like at that time. Next I fixed the lens distortion and vignetting. (I usually add a custom vignette at the last stage of the process)

Step 2 : Took the adjusted file and open up in Photoshop for further processing.

Step 3 : Added a fast exposure of the same frame and using a inverted mask brought in the static leafs of the trees.

Step 4 : Now I merged all the visible layers to create a new merged layer and opened that with Color Efex Pro 4 to add some Polarization. This has increased the vibrancy on the foliage and given some contrast to the clouds.

Step 5 : Next I used Silver Efex Pro to convert the image to B&W also added additional contrast to enhance the dynamics.

Step 6 : Finally I used a Curve Adjustment Layer and pulled the midtones just a bit to make the image a little darker. I inverted the mask on it and painted in a custom vignette to pull the viewers eye towards the subject in the frame.

And voila its done.
As you can see once you have the basic idea of what you want to achieve, it will be just few simple steps to get there.
Although this one took not more then half hour to process. I would admit that in some of other pictures I did spend days taking breaks in between to get to the final output.
Hope you guys have enjoyed the explanation here and will excuse me for the cranky language.
Till the next picture, keep clicking!!
You can visit my Facebook page and 500px page to view and review my work.

Step 3 : Added a fast exposure of the same frame and using a inverted mask brought in the static leafs of the trees.

Step 4 : Now I merged all the visible layers to create a new merged layer and opened that with Color Efex Pro 4 to add some Polarization. This has increased the vibrancy on the foliage and given some contrast to the clouds.

Step 5 : Next I used Silver Efex Pro to convert the image to B&W also added additional contrast to enhance the dynamics.

Step 6 : Finally I used a Curve Adjustment Layer and pulled the midtones just a bit to make the image a little darker. I inverted the mask on it and painted in a custom vignette to pull the viewers eye towards the subject in the frame.

And voila its done.
As you can see once you have the basic idea of what you want to achieve, it will be just few simple steps to get there.
Although this one took not more then half hour to process. I would admit that in some of other pictures I did spend days taking breaks in between to get to the final output.
Hope you guys have enjoyed the explanation here and will excuse me for the cranky language.
Till the next picture, keep clicking!!
You can visit my Facebook page and 500px page to view and review my work.
Subscribe to:
Posts (Atom)